Sealing and Flashing Metal Roofs

Sealants are rarely used on barn roofs because the roof slopes are typically
steep enough that rain and snow drain off in true watershed fashion. But house
roofs, with dormers, hips, valleys, chimneys, skylights, and plumbing vent
penetrations, put more demands on metal roofs. On houses, building a
"watertight" roof by sealing all joints, side seams, and endlaps in a metal
roof is critical for preventing leaks.
Tape vs. Gun-Grade Sealants
Thermal movement, freeze-thaw cycling, and exposure to ultraviolet
light will degrade even the best quality sealants.
There are two types of sealants used for metal roofs - tapes and
gun-grade. Tapes are preferred to gun-grade sealants because they have a high
solids content (about 97%) and don't shrink. Most tapes for metal panels are
butyl polymers, which will last 30 years or more if protected from exposure to
ultraviolet light. The gun-grade types are usually about 70% solids, which
means that when the 30% solvents evaporate, the sealant shrinks.
No sealant should ever be applied to the outside of a seam. But
when external sealant applications are unavoidable, do not use silicone. Many
silicone sealants contain acids, which can damage metallic coatings. Silicone
also has poor adhesive strength on metal. Urethanes are generally much better.
Still, any external sealant requires maintenance even under the best of
circumstances. The best option by far is to rethink the detail and try to find
a way to use a hidden butyl sealant.
Sealing Side Seams and Endlaps
Butyl tape is available in a variety of sizes. I recommend using a
minimum tape width of 1/2 inch. The tape typically comes in a roll, and should
be cut to length with a sharp knife, rather than torn, so that the bead
maintains its intended dimension and is not stretched.
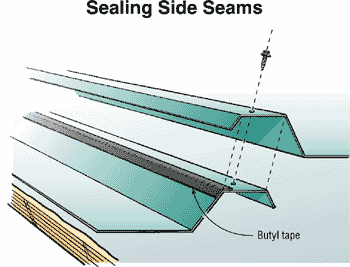
To seal the seams between adjacent panels, apply the tape to the
top shoulder of the panel rib, making sure that the majority of the sealant
winds up on the weather side of any sidelap fasteners (see Figure 1).

Figure 1. To seal the lap between
adjacent panels, apply butyl tape to the weather side of the rib shoulder.
Don't peel away the release paper until you're ready to install
the overlapping panel. Take care to ensure the exact alignment of the panel
before it contacts the sealant. Once a panel touches the tape, even a small
adjustment is extremely difficult.
Side seam fasteners should pierce through the sealant or be
placed on the "dry" side from the sealant. The ideal fastener for
sheet-to-sheet joining is a 3/4-inch 1/4x14 hex-head galvanized screw with a #1
drill point.
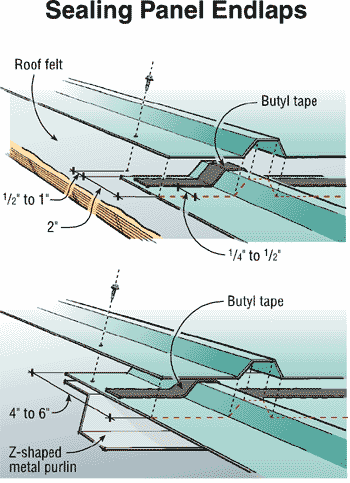
Seal the laps between panel ends with tape sealant, as shown in
Figure 2.

Figure 2. Use butyl tape to seal
panel endlaps, making sure the screws that fasten the panel to the deck top) or
to purlins and sleepers (bottom) are placed above the sealant, as shown.
by Rob Haddock
This article has been provided by www.jlconline.com. JLC-Online is produced by the editors and publishers of The Journal of Light Construction, a monthly magazine serving residential and light-commercial builders, remodelers, designers, and other trade professionals.

|

