Business Articles - On the Job
Articles & Tips
With high-quality materials and standardized methods, you can create custom porches at a production pace
My company specializes in decks and porches. We keep ten two- to three-person crews in the field and build more than 90 screened porches every year. To compete against the many superb craftsmen in my area, we've had to develop methods and construction details that enable us to work efficiently and make a profit but still produce a porch that says quality.

Premium Materials
For starters, I always use top-quality materials, for a couple of reasons.
First, using premium materials reduces the risk of callbacks and warranty
issues. Second, it tells my customers that I'm concerned about the longevity of
my product. And because the materials cost more and have a reputation for
quality, the markup yields a greater profit percentage than more conventional
materials would.
Kiln-dried PT. We use Madison Wood Preservers' (540/948-6801; www.madwood.com) pressure-treated southern pine for all of the structural floor and enclosure framing, and for the newel posts and railing systems. Madison includes a water repellent in the treatment process to retard moisture absorption and to resist the effects of weathering.
Primed trim. We use pre-primed pine for all of our painted trim. This lumber is coated on all sides with an oil-based primer, and all minor defects and knots are filled and sealed with an exterior-grade filler to prevent sap streaking and bleeding. We apply two topcoats of latex trim paint in the field.
Trex. We use this wood-plastic composite lumber for the deck surfaces outside our screened porches, as well as for rail caps. It's good looking, machines easily, and cuts down on maintenance chores. Trex decking (800/289-8739; www.trex.com) is available in 5/4 and 2-by profiles; we prefer the more substantial look of the 2-by stock.
Flooring to Keep Bugs Out
Many builders screen the underside of the porch deck or install a screened
skirt panel around the porch perimeter to keep insects out. We prefer to use
Madison's C-select 2x6 tongue-and-groove boards for a solid, gap-free porch
floor (see Figure 1). The product we use is kiln dried after treatment, which
eliminates the warping, twisting, and splitting common with ordinary wet PT
lumber.
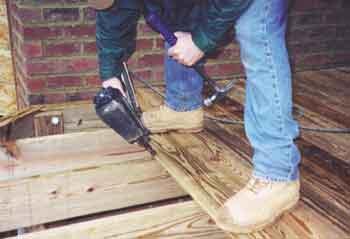
  |
| Figure 1. The author installs 2x6 pressure-treated T&G decking to prevent insects from entering between the floorboards of a screened porch. The decking is blind-nailed through the tongue to conceal the fasteners. |
The boards are reversible, with a square-edge finish on one side and a V-groove edge on the other. We typically install the boards diagonally across the joists, V-groove up, and blind-nail the boards through the tongue to conceal the fasteners.
There's a good reason I run my decking diagonally. Whenever you run decking perpendicular to the joists, you end up with scattered butt joints, which degrade the deck's appearance. By running the decking in opposing diagonals from a central point, you can cover a large surface with no end-butts. It's a clean, stylish look.
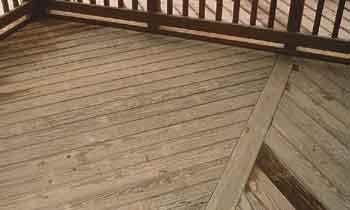
If a sundeck surrounds the porch, the two structures will share a common floor frame. I use gapped 2x6 Trex decking for the outside portion. To back the seam where the Trex meets the T&G decking, we install 2x6 PT blocking on the flat between joists, flush with the top edge (Figure 2).
 |
|
 |
Figure 2. Two-by blocking, installed on the flat between joists, supports the transition between the diagonally installed porch and Trex sundeck surfaces. |
Building Screen Porches, continued
Floor framing. Whether we’re building
a deck or a porch, we run the floor framing on 12-inch centers. Considering
that we always use 2-by decking, that may seem like overkill when 16-inch, or
even 24-inch, spacing would be acceptable. But 12-inch centers provide a stiffer
platform to build the porch on, particularly if the porch structure is set in
from the perimeter of the overall deck framing by several feet. I’d rather
not have a cluttered-looking forest of posts and pilings below the deck to support
the structure.
The added weight of the 2-by surface material — up to double the dead load
of 1-by or 5/4 decking — also makes it advisable to beef up the framing.
I run my Trex decking on the diagonal and screw it down at alternating edges
to reduce the frequency and appearance of surface fasteners. The closer joist
spacing keeps the screw pattern tight. Diagonal decking increases the distance
that the board must span between joists, so, again, the closer spacing offsets
this effect. And although 16-inch spacing may satisfy the code and my customers
might not notice the difference, my floor systems are stiff and rugged —
no one has ever complained to me about a springy-feeling deck.
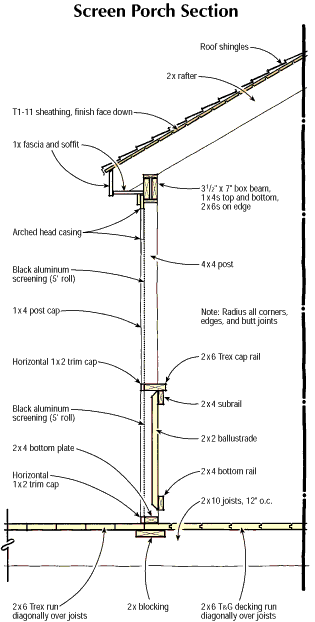
Framing the Enclosure
We assemble the pressure-treated porch enclosure system on the deck, using 4x4
uprights to define the openings, a 2x4 bottom plate, and a 1x4 top plate. Our
stock black aluminum screening comes in 5x100-foot rolls, so I design the porch
with 5-foot-maximum spacing between the upright centerlines.
We have a standard 2-8 x 6-9 wooden screen door that we use on nearly every porch. To keep all of the openings at a uniform height around the enclosure, we cut all the uprights equal to the finished height of the door, plus swing clearance. Including the bottom plate, the resulting opening height is 6 feet 11 inches. A 2x4 stretcher at the head of the door opening compensates for the height gain of the bottom plate and provides a backer for the finish trim.
On top of the 1x4 top plate, we build a continuous box beam, using a pair of 2x6s flush with the outside of the 3 1/2-inch-wide plate and capped with another 1x4 (Figure 3). We shoot all of these components together in place with 12d galvanized nails. There tends to be some discrepancy between the width of a 4x4 and the width of a 1x4. Because the screening and trim boards will be applied to the exterior face, we're careful to keep all of the framing flush to this plane.
|
| Figure 3. A box beam lintel consisting of 1x4 plates and 2x6 sides caps the 4x4 posts and runs the entire perimeter of the porch enclosure. |
Building the Roof
The roof configuration depends on the porch design, which is keyed to the
style of the home we're working on. One detail that we use on a straight gable
roof has become something of a signature for us. We build what I call a flying
gable, which, aside from being attractive, has an important function (Figure
4). Water will penetrate only about a foot or so into the porch along the eaves
during a rain, but it can penetrate much deeper through a high screened gable.
The projecting "prow" of our flying gable provides a deep overhang that keeps
the interior space drier.

|
| Figure 4. The author's signature "flying gable" roof helps keep windblown rain out of the porch. |
We use treated lumber to frame the roof, too. The rafters rest directly on the 2x6 box beam. If the rafters are to remain exposed on the interior side, we use 5/8-inch T1-11 plywood channel siding, finish face down, to sheathe the roof. The siding provides a finished appearance inside and an adequate nail base for the roofing (it's thick enough to prevent 3/4-inch roofing fasteners from penetrating through to the interior). For a more formal interior, we'll frame a flat ceiling and finish it with clear fir T&G edge-and-center-bead paneling. We give the fir three coats of clear urethane finish, or prime and paint it to match the trim of the existing home — either way, it makes a beautiful ceiling.
Roofing. We generally use asphalt shingles on the roof, though occasionally we hire a metal roof specialist to install a standing-seam prefinished metal roof.
Railings
Our typical porch railing system consists of a 2x4 sub- and top-rail with 2x2
square balusters. The balusters are beveled at each end and screwed to the wide
face of the 2x4s on 4-inch centers. The 2x4 rails are nailed to the inside face
of the 4x4 posts, mitered at inside corners. The balusters thus finish up 2
inches inside the outer face of the enclosure (Figure 5). We cap the subrail
with a Trex 2x6, notching it fully around the 4x4 uprights. The outer edge of
the rail cap ends up flush with the exterior post face. Wider than the 4x4
posts by 2 inches, the 2x6 cap rail overhangs the 2x4 subrail by 1/2 inch on
the interior side of the enclosure.
 |
|
| Figure 5. Surface-installed rails and balusters simplify construction and protect the screening from damage by children and pets. Because the screening doesn't contact the railing or balusters, they are barely visible from outside. | |
An upgrade rail system consists of a colonial profile pressure-treated
top-and shoe-rail, installed on-center between posts. The balusters fit into
dadoed grooves in the rails.
Building Screened Porches, continued
Screened Openings
Many builders rely on removable screen panels to complete the porch enclosure.
Custom wood frames, aluminum frames with vinyl splines, or a
combination of the two will certainly do the job, but they also add a lot of
labor and unnecessary cost to the job.
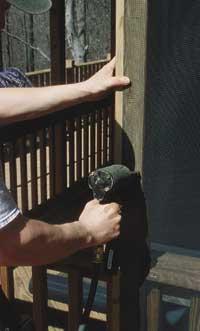
My system is much faster to install, completely effective, and equally good
looking. Once the framing is complete, it doesn't take long to screen the openings.
We unroll and cut a length of screening sufficient to cover the opening from
top to bottom. A couple of 3/4x1-inch-wide pneumatic roofing staples tack the
screen at the top while we staple down one side, taking care not to pull and
distort the screen (Figure 6). Then we staple the opposite side. If the staples
are widely spaced initially, the installer can tug at the screen between fasteners
to remove ripples and sags. After the bottom and top edges are tacked and the
screen is drum-tight, infill stapling completes the job. Any excess screening
is trimmed away with a utility knife.
 |
|
| Figure 6. Asphalt roofing staples hold the screening tight, and are less tiring to install than conventional screen staples. Sagging screen is pulled tight between staples and secured to ensure a drum-tight fabric installation. | |
The use of roofing staples may seem unusual, but the heavier wire penetrates the hard pine more effectively than lightweight screening staples. Pneumatic stapling is also quicker and much less tiring than squeezing off an equal number of conventional screening staples.
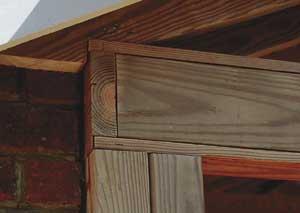
Arched Trim
Most of our porches feature painted trim that matches the existing house trim.
Before installation, we paint the edges and one face of all the primed stock
with two coats of premium exterior latex. Whenever possible, instead of measuring,
we tack-fit and mark all of the trim in place for speed and accuracy. The first
trim board to be fitted is the arched head casing above the openings (Figure
7), which is made from a single 1x12 with its lower edge dropped 8 inches below
the box beam. We trace all of the upright locations and the bottom edge of the
box beam onto the backside of the head casing for layout and cutting. We hold
a scrap of 1-by material alongside the top of the 4x4 posts to create a wide
shoulder detail at the arches' spring lines.
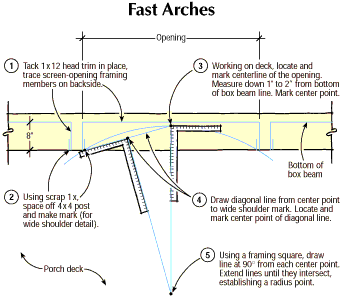 |
| Figure 7. The author uses a simple method for producing custom arches in the continuous, dropped headcasing that accents the individual screen openings. After establishing the radius point of the arch, he uses a site-made trammel stick to draw it directly on the 1x12 stock. The resulting arch, cut with a jigsaw, is perfectly matched to each opening. |
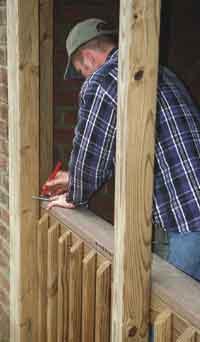
Working on the deck, we use a quick layout method to establish the radius for the arches, then cut them out with a jig saw. We touch up the cut with a belt sander, then round over the edges with a 1/2-inch-radius router bit.
Fast dimensions. Before we take the head casing back down for cutouts, we map out the rest of the trim. We temporarily cap the bottom plate with a continuous 1x2 base molding. This makes it easy to mark all of the vertical 1x4 post trim in place by standing it on the base mold and marking it for cutting where it meets the head casing.
We cover the edge of the Trex rail cap with a piece of 1x2 horizontal trim. After dry fitting, we label all the pieces for location and take them down for cutting, edge routing, and painting. We prime all of the cuts with an oil-based primer, then coat the weather side of the trim with two coats of latex.
Fussy details. The routed rollover edge is
another of our signature details (Figure 8). Every last finished edge, notch,
and joint in my system receives the rollover treatment. The final appearance
is not only attractive, but also subtly informs my customers that every piece
of the porch has been "fussed over." Rolling the edges also eliminates the need
to shim joints for precise alignment — joints where the boards may be slightly
out of plane or of unequal thickness.
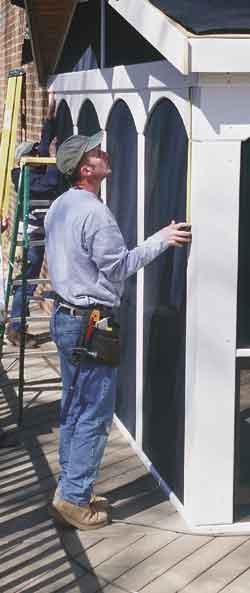 |
Figure 8.
Simple, router-rolled corners finish nearly every edge and joint in the system, giving an appearance of heightened detail while concealing small deviations in plane and material thickness. |
 |
|
When the paint is mostly dry, we install the trim in the same sequence as it was originally laid out: head casing, base mold, post caps, and frieze board. The frieze board closes the gap between the top of the head casing and the roof soffit. We fasten all of the trim with flush-set, stainless, hex-head finish screws. They're easy to reverse if you forget a step or need to make an adjustment.
Finishing. Although the trim goes up primed and painted, there's always a need for touch-ups. With all of the jobs I have going, I can keep a subcontracted paint crew pretty busy. To reinforce the water repellent in the treated lumber and keep it looking good, we always apply a semi-transparent finish to the floor, American Building Restoration Products's (800/346-7532; www.abrp.com) X-100 Natural Seal in Cedar Tone Gold shade. We use the same product in white for all of the railings and balusters. My customers receive a product brochure at the first sales call. I make sure that the supplier has stamped his business address and phone number on the brochure so they know where to get their materials when it's time to stain or touch up again.
In my experience, the first stain job lasts only about three years on pressure-treated
lumber. I tell the homeowner to expect this, but that the follow-up stain job
should perform for seven years or more.
Jim Craig is the owner of Craig Sundecks and Porches in Manassas, Va.
This article has been provided by www.jlconline.com. JLC-Online is produced by the editors and publishers of The Journal of Light Construction, a monthly magazine serving residential and light-commercial builders, remodelers, designers, and other trade professionals.
Join our Network
Connect with customers looking to do your most profitable projects in the areas you like to work.