Business Articles - On the Job
Articles & Tips
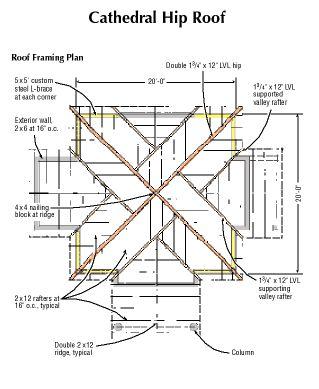
Building a Strong Cathedral Hip Roof
Custom steel brackets at the corners keep the hips from spreading
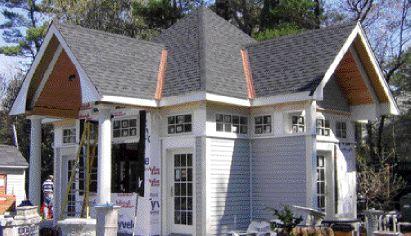
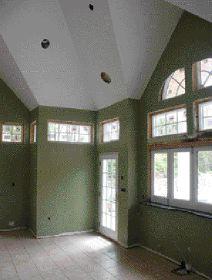
My small remodeling company specializes in renovation, but we occasionally take on new construction, like the architect-designed pool house shown here. One of the keys to working successfully with an architect is to build the project exactly as drawn. On this job, I noted that the framing plan showed no collar ties, cables, or other means of bracing for the full cathedral hip roof covering the pool house. This wasn't an oversight, but was intended to create an expansive interior space.
Still, with my background in architectural engineering, I recognized a structural challenge. Instead of taking the obvious route and persuading the client to accept a few ties in the final design, we decided to find another way to frame the roof to resist the outward thrust of the hips and the tendency of the rafters to sag under a snow load.
Steel to the Rescue
Ultimately, we decided to use the four main building corners to lock the hips in position. We reasoned that as long as the corners couldn't move or separate, neither could the hips. But, rather than expect the sidewall sheathing, overlapping top plates, and framing nails to hold the corners together against the thrust of the hips, we opted to use custom-made steel L-braces on the top plates to reinforce the framing.
A local steel fabricator made the brackets, based on a plywood pattern I gave him to copy. We used 1/4-by- 4-inch steel plate to make the 5-by- 5-foot L-bracket arms. At the corners of each L are two rectangles of steel, welded on diagonally to form a saddle that catches the ends of the hip rafters. The saddles have a 3 5/8-inch spread, giving us a little slack so we didn't have to fight the doubled LVL hips into place.
The brackets were drilled with 3/8-inch-diameter holes for lag-bolting to the plate, and the saddles were drilled to receive two 1/2-inch through-bolts to secure the hip rafters.

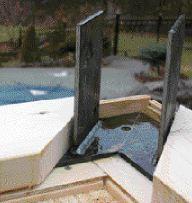
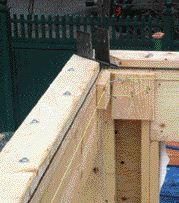
Four L-brackets custom-welded from 1/4-inch steel plate reinforce the corners of the building against the outward thrust of the double-LVL hip rafters. The saddle at the corner of each bracket is pre-drilled for a 1/2-inch bolt. The brackets were sandwiched between the top plates; lag screws hold the assembly together.
Accurate Framing
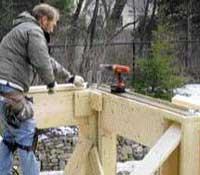
We framed the walls with 2x6s on 16-inch centers, topped by a single plate. To ensure that we wouldn't be struggling to fit the heavy, 20-foot-long double LVL hip rafters, we took great care to square, plumb, and brace the four supporting corners to tight tolerances. The main square of the building was interrupted on three sides by the ells, so we stretched string lines from corner to corner across the gaps and left them in place for constant reference against possible movement. We set the lines on 2-by offset blocks inside the top plates and used a 2-by block as a feeler gauge to check the alignment.
While waiting for the steel brackets to be delivered, we went ahead and packed the plate between bracket locations with plywood to accommodate the thickness of the steel. After wrestling the steel into place, we installed a second 2x6 top plate over the assembly, first tracing the bolt-hole locations onto the plates and predrilling them for lag screws. We then used 3 1/2-inch-long lags to tie the wood and steel layers together.
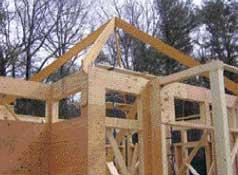
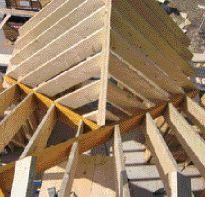
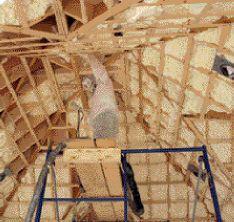
Restrained by the steel brackets at the corners, the structural hips bear against one another at the peak and need no further means of support. Supporting valley rafters running from top plate to hip rafter hold up the small ell gables.
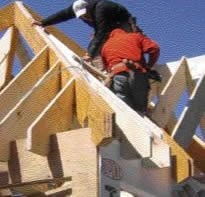
To work comfortably at the roof peak, which was 21 feet above the deck, we set up pipe staging inside the building. That involved pulling the temporary spring braces on the walls. We were pleased to find that the steel braces held the walls perfectly plumb throughout the roof framing process.
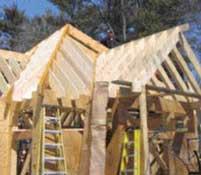
We used double 1 3/4-by-12-inch LVL hips, following the computer-engineered framing plan supplied by our lumber distributor. Each hip received a birdsmouth cut at the heel and a square-faced plumb cut at the ridge. The hips butted against a 4x4 nailing block at the ridge. In addition to carrying the 2x12 rafters, each hip provided support for the ells' valley rafters. We framed each of these ell roofs with a combination supporting and supported valley.
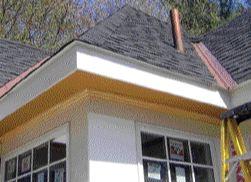

The tall walls allow for a generous overhang without cramping the tops of the windows below. V-crimped copper valleys and copper stacks are both durable and elegant.
Hot Roof
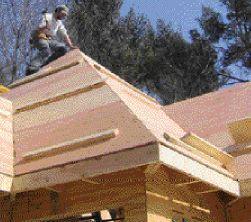
Venting a hip roof is problematic because most of the rafter bays terminate against the hip rafter and not at the ridge, leaving no practical means of carrying air through from the eaves. We avoided the entire issue by blowing in Icynene foam insulation, creating an unvented "hot roof."
Typical for our region, we applied 1x3 furring strips on 16-inch centers to the underside of the rafters in preparation for plaster board. With all the angles on this ceiling, the plasterer didn't mind not having any collar ties to cut around, and the clients are pleased with the final results. It's been over six months since completion, and there hasn't been a single crack in the finish. It appears that the bracing works just as we intended it to.
Complex roofs are difficult to vent properly, so the author opted for an unvented "hot roof," using spray-in-place Icynene insulation to prevent moisture-transport problems.
David West owns Meadowview Construction in Haverhill, Mass.
This article has been provided by www.jlconline.com. JLC-Online is produced by the editors and publishers of The Journal of Light Construction, a monthly magazine serving residential and light-commercial builders, remodelers, designers, and other trade professionals.
Join our Network
Connect with customers looking to do your most profitable projects in the areas you like to work.