Business Articles - On the Job
Articles & Tips
If you understand the fundamentals, you'll keep costs down, improve the strength of your concrete, and minimize cracks.
Ready-mix plants all around the country sell hundreds of different concrete
mixes. Fine-tuning your mix and your techniques can get pretty complicated. But
you can usually do good work if you just grasp the essentials.
Because I'm covering the basics here, I may oversimplify a few points. Experts
in the industry could point out exceptions to many of the general statements I
may make. But by and large, the ideas I'm about to explain hold true.
The 10-20-30-40 Rule
Let's start by discussing the essential ingredients of concrete. A typical
concrete batch, by volume, contains roughly 10% cement, 20% water and air, 30%
sand, and 40% gravel (see Figure 1). The exact proportions vary up or down a
little, but 10-20-30-40 is a good rule of thumb.
| Components of Concrete |
 |
| Figure 1. Rock and sand make up the bulk of a batch of residential concrete. The water/cement paste glues the aggregates together, with just enough extra water to make the mix workable. |
So 70% or more of any concrete structure is nothing but sand and gravel.
That's very cost-effective: Good aggregate is actually stronger than cement,
and much cheaper. The main idea when you make concrete is to use as much
aggregate as practical, with just enough cement paste to glue the mix
together.
To achieve this, you want a "well graded" sand and gravel mix (containing
roughly equal proportions of the various aggregate sizes, from large gravel on
down to medium or fine sand). That way, the smaller particles fill in the void
spaces between the larger chunks, so that there is very little void left to
fill with cement paste (Figure 2).
 |
Figure 2. This magnified photo of a slice of concrete shows a well-graded aggregate mix locked into a matrix of hardened cement paste. Small pieces of gravel and sand fill the voids between larger chunks, reducing the amount of space to be filled by water/cement paste. This helps to hold down costs, improve strength, and minimize shrinkage of the concrete. |
When you pump concrete, the stone shouldn't be too big - 3/4-inch gravel is a
typical maximum for pumped concrete. But if you're taking your mix straight off
the chute, gravel as large as 1-1/2 inches should give you no trouble, and
large aggregate is actually a good thing to have. For one thing, it helps
reduce shrinkage. A lot of shrinkage happens when water evaporates out of the
cement paste - which means the more stone and sand there is, the less overall
shrinkage. Also, large chunks of gravel interlock against each other, which
helps restrain shrinkage.
There's another benefit to large aggregate. The larger the particles you use
to get well-graded aggregate - the bigger the gravel and the coarser the sand -
the less water and cement your mix will require to begin with. This is because
it takes less fluid to coat big particles than to coat little particles. A mix
that uses less cement is more economical; and other things being equal, lower
water demand will mean better concrete.
Types of Cement
We'll get back to the water, but first let's consider cement. In the mixing
truck, the cement and water form a paste. After you place the mix in the forms,
the water and cement react together chemically (hydrate) to form a solid
matrix. This hydration reaction (which also generates heat) binds the sand and
gravel into a hard mass.
There are five main kinds of cement on the market, known as Type I through
Type V (Figure 3). If you include the air-entraining varieties of Types I, II,
and III, there are eight types; but air-entraining cements are less common now
that there are air-entraining admixtures that we can use instead.
|
| Figure 3. Concrete types I, II, and III will meet most residential needs. For freeze-thaw durability, order air-entraining cement or an air-entraining admixture. |
Probably 90% of the cement sold in the U.S. is either Type I or Type II.
Standard Type I cement is good for almost every residential purpose, except
where soils and ground water contain sulfates that can attack concrete. In
sulfate areas (mainly out West), Type II is used because it's sulfate
resistant. Type V, the cement with the highest sulfate resistance, may be
necessary where extreme sulfate conditions exist.
Most ready-mix plants don't stock Type IV cement, and a residential builder
would probably never need it. This "low heat of hydration" cement is used for
massive industrial placements like big dams, where the heat buildup in a large
volume of concrete could create problems.
But Type III cement, the "high early" variety, is common. Residential
contractors often call for it when rapid strength gain is important - either
because the schedule is tight or because there's concern about freezing. You
can also achieve high early strength by just adding more cement to the mix -
say, an extra 100-pound bag per yard - or by using an accelerator like calcium
chloride. (In my part of Minnesota, where summers are short and winters are
cold, we'll often do all three: use Type III cement, add an extra bag of cement
per yard, and also add some accelerator.)
Air-Entrained Concrete
For most residential work, some amount of air entrainment is essential for
long-term freeze/thaw resistance. Air-entrained concrete has billions of
microscopic air bubbles mixed into it (Figure 4). If you order air-entrained
concrete, your concrete supplier will either use air-entraining cement or add
an air-entraining admixture at the batching plant. The mixing action of the
truck blends air into the concrete, while the admixture helps the tiny bubbles
hold their shape.
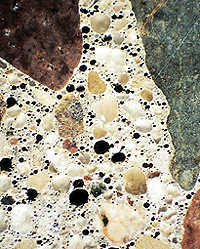 |
Figure 4. In this magnified slice of air-entrained concrete, the separated air bubbles provide space to relieve the pressure of expanding ice. Air-entrained concrete surfaces will endure many years of winter freezing and thawing. |
When the concrete sets up and hardens, the little air voids give excess water
in the concrete space to expand when it freezes. Air-entrained concrete can
hold up over many more freeze-thaw cycles than non-air-entrained concrete. By
the time fresh concrete reaches a strength of 500 psi (usually within a day or
two), the air entrainment is well enough developed that the concrete can
withstand freezing.
Entrained air bubbles are very small - mostly between a tenth and a hundredth
of a millimeter. Air bubbles larger than a millimeter are not "entrained" air,
but "entrapped" air. Entrapped air is not very helpful, and you can mostly get
rid of it by rodding, spading, or vibrating the wet concrete as you pour. That
consolidation process still leaves the little entrained air bubbles intact.
In Minnesota, we commonly use 6% or even 8% air in a slab designed for outdoor
use, or when a freeze might hit before a basement is closed in. A 2% or 3%
entrained-air mix is a good precaution, even in moderate climates.
If you think your slab won't ever see freezing, you can do without air
entrainment altogether. But the lubricating effect of the little bubbles in the
wet mix, which acts to make the concrete more workable with a lower water
content, is a good enough reason by itself to use air-entrained concrete most
of the time.
Air entrainment affects the art of finishing slabs. The tiny air bubbles
increase the buoyancy of the paste, and slow the upward movement of bleed
water. This can influence your finish timing: Where you'd ordinarily wait for
bleed water to evaporate before troweling the surface, you may not even see
bleed water on an air-entrained slab. Don't be too quick to jump on the slab,
though: That water's still there under the surface, and some of it needs to
evaporate out. Otherwise, you can trap the water under a hard-troweled skin,
where it may build up and cause scaling later. If you're just broom-finishing,
no problem, of course.
The Importance of Water
All of concrete's ingredients are important to its quality. Your supplier, not
you, has to worry about providing good quality cement, sand, and gravel. But
one big factor is in your hands - the amount of water in the mix. When you
holler out "Add water!" during a pour, you really change the concrete. Restrain
yourself: Limiting the water content is crucial for strong, hard, durable
concrete, and to reduce shrinkage and cracking.
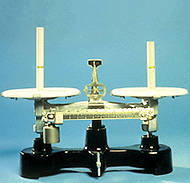
Water/cement ratio. As engineers will tell
you, the water/cement ratio is the weight of the water per yard in the mix
divided by the weight of cement per yard. Concrete's water/cement ratio is
usually somewhere between .4 and .6.
As an example, let's take an average yard of concrete, a typical five-bag
residential mix. If we start with 30 gallons of water per yard, which weigh
8.33 pounds per gallon, the water weighs about 250 pounds per yard. Five bags
of cement per yard, at 94 pounds to the bag, works out to about 470 pounds of
cement per yard. Divide 250 by 470, and we find that this typical residential
concrete mix has a water/cement ratio of .53 - that is, before the contractor
yells out, "Add 20 gallons!"
If you add 20 gallons to a 10-yard load, that's 2 gallons per yard, or 16.66
pounds. Your water/cement ratio will go up to .56 or .57 - and your concrete
will be weaker.
Strength losses. As a rule of thumb, for
every gallon per yard of water added on the job, you lose at least 200 psi in
strength. If you add 20 gallons to a 10-yard load - 2 gallons per yard - you
are probably losing 400 to 500 psi (Figure 5).
 |
Figure 5. The more water you add on site, the weaker your concrete will be, and the more it will shrink and crack. Adding 2 gallons per yard will cut compressive strength by around 10% and increase shrinkage by close to 20%. |
Shrinkage. Besides reducing the structure's ultimate strength,
adding water on site will also increase the total amount of shrinkage.
Of the water in a concrete mix, just 25% to 30% is necessary for the hydration
reaction. The rest of the water is only there to make the concrete workable.
Any water that isn't involved in the hydration reaction either evaporates (25%
to 30%), or remains indefinitely within the pore spaces in the concrete (40% to
50%). Most of the extra water you may add on site will quickly bleed and
evaporate out. As the water leaves, the concrete shrinks; as the concrete
shrinks, it cracks.
Some cracking of concrete is unavoidable, as we all know. But cracking is
directly related to the water content of the mix. More added water means more
and bigger cracks. That's another reason to add as little water as you can.
Reduced density, increased porosity. Not all the water that
evaporates out of concrete results in shrinkage. If the concrete sets up and
hardens before the water comes out, it won't typically shrink and crack as
much; instead, it will be less dense and more porous. That's because when you
add a lot of water to concrete, you increase the volume; but when the water
dries out, all it leaves behind is air.
Figure 6 shows a series of test cylinders made with concrete of differing
water/cement ratios, ranging from a .25 ratio (about the minimum you can do) up
to a .7 ratio. There is the same amount of cement, sand, and rock in each of
these samples - the only difference is the amount of water.
|
||||||
| Figure 6. Added water will increase the volume but not the density of concrete. The larger cylinders in the photo above were poured with increasing watercement ratios, but weigh the same after drying as the smaller samples (above right). In service, concrete poured with higher water/cement ratios will be structurally weaker, softer, less durable, and more permeable. |
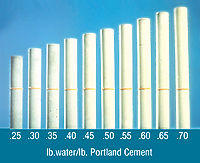
After oven drying, all of these samples weigh the same amount; but as you can
see, the ones with more water are larger. The difference is air - and air
doesn't have a lot of strength. The sample on the left is probably 8,000-psi
concrete, but the low-density sample at the right is probably 1,800 psi. The
center samples are where most residential concrete is, probably somewhere
between 3,000 and 4,000 psi.
Moisture Problems
Besides being weaker, porous concrete made with a high water/cement ratio will
end up being more permeable. As concrete is hardening, the cement and the
aggregate sink as the bleed water rises. Water flows around the particles and
through the sand and cement paste, leaving behind a lot of little voids and
capillaries in the hardened concrete (). After the concrete cures, those
capillary voids let water and vapor move through finished slabs and walls,
which can add to moisture problems.
Most basements experience a certain amount of dampness: at first from water
evaporating out of the concrete itself, and later from moisture in the ground
moving through the concrete via capillary action. Both moisture loads are
directly related to the proportion of water in the mix.
Evaporation. If an average yard of concrete
contains 32 gallons of water, and 28% of that evaporates, 9 gallons of water
per yard is going to come out of a typical foundation. From the footings,
walls, and slab in a big basement, something like 400 to 700 gallons of water
vapor will enter the house. That's a lot of moisture - and the wetter the
concrete you pour, the more moisture there will be.
It takes about three years for all of that vapor to come out of the concrete,
but the bulk of the evaporation is a first-year concern. About a third comes
out in the first 30 days - probably before the house is even finished. The next
third comes out in the first year after the pour, so by the end of the first
year two-thirds of the water is out. Right when a house is built, if you stud
out the basement walls and slap up insulation and poly, you'll get moisture
within the wall. You'd be wiser to let the basement dry out for a while
first.
Ground moisture. Unfortunately, water in the poured concrete
isn't the only source of moisture in basements and slabs. All over the country,
ground moisture moving through foundation slabs is a common problem.
As the water moves through the slab, it brings up various chemical salts from
the unhydrated cement. The water evaporates and leaves the salt behind as a
white fuzzy dust. This material can build up behind a membrane and debond many
types of coatings. If rising moisture exceeds about 3 pounds of water per 1,000
square feet over a 24-hour period, it exceeds the breathing ability of many
floor coverings: Such moisture can build up and ruin the adhesion of vinyl
flooring and tile.
If you pour a stiff mix, the concrete should be watertight. But vapor
permeability, though reduced, will still exist. So good concrete alone isn't
the total solution to ground moisture problems: Proper grading, surface
drainage, waterproofing, and perimeter drainage are also important (see the
related article, ).
How To Do a Slump Test
In Figure 7, the top left photo shows what an engineer likes to see - nice
stiff concrete. In the top right is what the guys with the shovels like to see
- soupy wet concrete that flows naturally. Somewhere in between is a happy
medium that is wet enough to be workable but dry enough to result in good hard
concrete.
|
|||
| Figure 7. Stiff, low-water-content concrete (above left) is easy to tell apart from concrete with a lot of added water (above right). Slump tests (below) are used on site to maintain uniform water content in successive loads of the same mix. The 9-inch to 10-inch slump shown by this example (measured from the height of the cone to the top of the slumped concrete) is not as hard to work with as a stiffer mix, but may contain too much water. To increase slumps without adding water, consider a superplasticizing admixture. | |||
|
|||
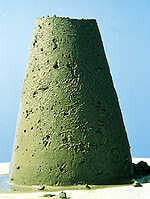
On site, the accepted way to gauge and control water content is the slump
test. To do the test properly, use a standard cone 12 inches high, 4 inches
wide at the small end, and 8 inches wide at the big end. You fill the cone up
about 1/3 full, rod it 25 times, fill it up to 2/3 full, rod it 25 more times,
and then finally fill it to the top and rod it again. Then you remove the cone
and measure the slump from the top down. This picture shows a 9-3/4-inch-slump
concrete - a very pourable concrete.
Although the slump test is basic concrete practice, not everyone understands
it. I've even seen guys measure from the bottom of the pile of concrete up
instead of from the top of the cone down. Then they'll say, "I'm doing a 2-inch
slump concrete." If they understood the test they'd know they have a 10-inch
slump, not a 2-inch slump. That's a pretty wet mix.
On site you have to make a practical compromise between workability and
maximum strength. In the American Concrete Institute (ACI) Committee 332, which
I belong to, we're creating updated standards for residential concrete, and
have spent a fair amount of time discussing slumps. Some of the ready-mix guys
have argued for the 4-inch slump, but 4-inch-slump concrete is pretty tough
material to pour, unless you are going to pump it. All the poured-wall guys
wanted to go to a 7-inch slump. In the end, we worked out a compromise: a
4-inch to 6-inch range.
Concrete work is heavy labor, and there's an understandable desire to pour a
higher slump, just to make the concrete more flowable. Suppose you go ahead and
increase the slump by adding water? As a rule, it takes a gallon or more of
water per yard to add about an inch to your slump. So to increase the slump
from 5 inches to 9 inches, you'd need to add about 4 or 5 gallons. That could
reduce the strength of your finished concrete by as much as 1,000 psi.
If you need such flowable concrete, you should get your supplier to teach you
about superplasticizers. If you start with a 5-inch slump and then
superplasticize it, you can get an 8-inch or 9-inch slump that is relatively
easy to work with. And because you don't have to add water, you've maintained
good strength.
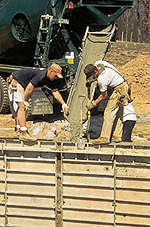
Handling Concrete
Very flowable concrete is the easiest concrete to pour. When you see concrete
slurping down the chute like this (Figure 8), it's a good bet that the crew has
souped up the concrete with a lot of water. I call this technique "irrigating
the forms."
|
|||
|
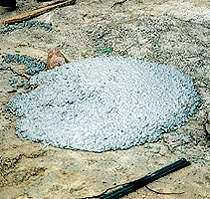
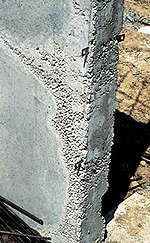
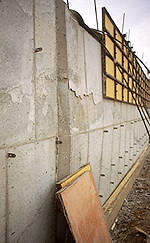
Now, you can do a good job with very flowable concrete if you move the chute
and puddle the concrete where it is intended to be. But if you dump a whole lot
in one corner and then pull it along the form with hoes, the aggregate starts
coming out of the flow and separating from the cement. Where there's a lot of
gravel in one place and not enough cement, the result is honeycombing (Figure
9). A result like this usually means that someone tried to make the concrete
flow too far. You can also see the results here as visible lines in the
wall.
|
|||
| Figure 9. Concrete that's very flowable eases the labor of placement, but can cause quality concerns. Moving a wet mix too far with hoes can create segregation (left), while the increased pressure created by vibrating a wet mix may snap a form tie and "pillow out" the wall (right). | |||
You'll also get lines like that if there's a delay between one lift of
concrete and the next, especially if you pour a wall in hot weather. Once you
start a wall pour, it's best to keep the concrete coming at a steady rate, and
not allow part of the wall to set up before the next lift is placed on top of
it.
You should also consolidate each lift in a wall as you place it. Very flowable
concrete can be consolidated by rodding it with a steel rod; stiff concrete is
better consolidated with a vibrator. But if you have a high-slump mix,
over-vibrating can create problems: It causes the gravel and sand to segregate
out from the cement, and increases the pressure on the forms, which may cause
you to pop a pin on a snap-tie, causing the wall to "pillow" out. One popped
pin is more of an aesthetic problem than a structural problem, but too much
pressure on the forms could cause a blow-out.
Vibrating is appropriate when you use wood
forms or steel forms. Contractors with aluminum forms have to be very careful
vibrating, because the aluminum forms are somewhat deflectable and may pillow
from the pressure.
Use the vibrator to consolidate the concrete in place and get the big air
bubbles out of it. Don't use the vibrator to move the concrete from one spot to
the next - that typically creates segregation. And while it's not a big deal if
the vibrator bumps up briefly against the steel (in fact, this probably
improves the steel-to-concrete bond), you don't want to deliberately vibrate
the steel by holding the vibrator to the rebar. That could actually weaken the
bond between steel and concrete.
There's a lot more to learn about building with concrete - things like how to
use admixtures, how to control cracking, how to deal with cold or hot weather,
how to cure concrete, and when, how, and where to place reinforcing steel. But
if you start with the basics - choosing the right cement, using large,
well-graded aggregate, keeping the water content down, and placing and
consolidating carefully - you're off to a good start.
Brent Anderson runs a contracting firm near
Minneapolis, Minn., specializing in residential and commercial concrete
construction and repair.
This article has been provided by www.jlconline.com. JLC-Online is produced by the editors and publishers of The Journal of Light Construction, a monthly magazine serving residential and light-commercial builders, remodelers, designers, and other trade professionals.
Join our Network
Connect with customers looking to do your most profitable projects in the areas you like to work.