Business Articles - Specialty and Trade
Articles & Tips
A sloped finish grade and properly placed perimeter drains will keep the basement dry
by Brent Anderson, P.E.

As a concrete contractor, I have a vested interest in how well the water on site is controlled. Underground water and runoff from rain and snow pose a threat both to the structural integrity of the foundations I build and to below-grade interior living space. Wet basements and cracked foundations are difficult to fix after the fact, but good perimeter drainage, both at grade and down at the footings, is a cheap and easy way to prevent problems. If you follow these rules of thumb for perimeter grading and drain tile, you’ll sleep easy knowing that the water control systems you buried today won’t bubble up into a callback tomorrow.
Surface Runoff
Although some wind-driven rain strikes the siding and drains onto the
ground, most surface runoff comes from the roof, and the amount of runoff
varies according to the size and style of the roof. A gable roof deposits all
runoff onto the ground under the eaves, with little runoff at the gable ends; a
hip roof distributes the runoff more evenly on all sides (see Figure 1).
Gable Roof Runoff |
Figure 1. Both of these roofs cover approximately 2,500 square feet. The gable roof deposits runoff along two sides of the house; the hip roof spreads the runoff more or less evenly along all sides. Main roof valleys and dormers concentrate the runoff into smaller areas on the ground. |
 |
|
Hip roof Runoff |
|
 |
| Roof Runoff | |||
|
(from 2500 sq. ft. roof) |
|||
| Rainfall | Rainfall | Volume | Volume |
| Amount | Rate | (cubic ft.) | (cubic ft.) |
| 1 in. | per hr. | 200 | 1500 |
| 1 in. | per day | 200 | 1500 |
| 2 in. | per hr. | 400 | 3000 |
| 2 in. | per day | 400 | 300 |
|
|
|||
In addition, valleys at main roof intersections and dormers can concentrate runoff into a relatively small area on the ground. In cold climates, runoff increases significantly during spring rainstorms when higher temperatures and rain combine to melt snow on both the roof and the ground, adding to the total amount of surface water that must be drained away from the foundation.
Sloped grade.Most basement water problems can be solved by properly sloping the ground around the house. The finish grade should slope away from the foundation at the rate of 1/2 to 1 inch per foot for 6 to 10 feet. A 2- to 4-inch cap of silty-clay material will keep runoff from percolating down through the backfill.
A sloped grade will not work for long, however, if the perimeter fill is not mechanically compacted, which is rare in residential construction. Instead, compaction is left to chance and occurs slowly over a period of months or years, depending on climate and the type of backfill used. Gravels and sands percolate faster and may reconsolidate more quickly — typically, from three months to a year. Silts and clays, which have a much slower percolation rate, may not compact for several years.
In either case, however, the result is a negative grade that directs runoff back toward the foundation. Depending on the type of backfill, sooner or later the runoff will overwhelm the footing drainage system, and basement water problems will appear. Silt or clay fill, which hold water longer than gravel or sand, can make the foundation more susceptible to cracking from frost action; hydrostatic pressure may also develop with these types of fill, forcing water through the slab-footing joint. Rarely will any of these problems appear immediately, but down the road, you’ll be faced with a messy and expensive repair job.
Gutters. While gutters can dramatically reduce the total ground area onto which roof water drains, it is crucial to use a sloped leader to extend downspouts along the ground to carry water away from the foundation (Figure 2).
Downspout with Sloped Leader |
Figure 2. Sloped downspout leaders should discharge at least 10 feet away from the foundation wall. |
 |
|
|
Use solid drain pipe to carry runoff from a concrete catch basin to daylight or a drywell . |
 |
Otherwise, a gutter-and-downspout system compounds the drainage problem by concentrating the entire roof runoff load into a few small areas, usually at the house corners. Leaders should discharge onto sloping ground at least 10 feet from the foundation. If downspouts dump directly into a catch basin on the surface or underground, the collected runoff should be carried through a solid drain pipe to a drywell or to daylight.
Keep gutters clear of leaves, pine needles, and ice. Overflow from blocked gutters can follow the contour of the gutter and saturate the soffit and siding, often making its way into the wall and wetting the insulation, drywall, and floor. Similarly, gutters in cold climates can encourage ice damming, with the same damaging results.
Hardscape.Concrete or paver block sidewalks can also control percolation of runoff
into the backfill (Figure 3) — I’ve measured reductions in runoff
percolation of between 300% and 500%.
Concrete or Paver Sidewalk |
Figure 3. A properly sloped concrete or paver sidewalk will reduce the amount of runoff that percolates through the backfill (top). Where perimeter plantings are used to landscape, improve drainage by burying a sheet of polyethylene below the plant bed, with openings cut out for roots (bottom). Tie shallow perforated drain tile to solid pipe to carry water to daylight or a drywell. |
 |
|
Plant Bed with Drain |
|
 |
Again, the hardscape should be wide enough to cover the entire backfilled area, and the surface should slope away from the foundation walls.
A less expensive technique is to bury a sheet of polyethylene in a plant bed. The poly should cover the backfilled foundation trench and slope to a perforated drain tile laid parallel to the foundation. Use solid pipe to carry runoff to daylight or to a drywell. In landscaped areas, cut openings in the poly to accommodate plant and tree roots.
Buried poly works well, so long as the backfill has been compacted. With a negative grade, however, the poly actually directs the water into the foundation wall. Plant and tree roots near the foundation can also compound problems with uncompacted fill, because their root systems absorb water and cause the soil to reconsolidate quickly. In a drought, tree roots can pull so much moisture out of the soil that the foundation may settle.
Perimeter Footing Drains
Foundation perimeter drains work in both directions. They not only
carry rainwater percolating down through the backfill away from the foundation,
they also relieve excessive hydrostatic pressure from rising groundwater. By
helping the backfill dry out more quickly, properly installed perimeter drains
reduce lateral soil pressure, which in turn means that foundation walls can be
designed to use more porous materials and less steel.
There’s a right way and a wrong way to install perimeter drainage. Unfortunately, many foundation contractors and home builders labor under a false sense of security, reasoning that if complaints about leaky basements don’t surface within the first year or two after a project is completed, their construction techniques must be working. The fact of the matter is that basement water problems that occur within the first twelve months are usually related to waterproofing defects. Drain tile problems typically take many years to develop. Thus, many contractors have buried time bombs that will eventually blow up in their faces.
Holes Down
Although porous cement-based tile is still in use today, most residential
contractors would agree that perforated 4-inch-diameter plastic pipe produces
tighter joints and is easier to work with. Not all would agree, however, on
which direction to place the holes in the pipe when installing footing
drains.
The answer depends on the type of pipe. Flexible HDPE (high-density polyethylene) is slotted all the way around, and some rigid PVC has a pattern of holes around the entire circumference. With these types of drain tile, there is no “right” direction because there are openings on all sides. Plugged holes on the bottom are cleared by water entering through the sides and top.
The most popular drain tile, however, is rigid PVC that has just two parallel rows of holes close together along its length. The classic approach is to lay this type of drain tile with the holes facing down, in the five-o’clock and seven-o’clock positions. This allows a rising water table to enter the pipe at its lowest point.
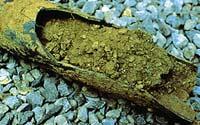
Filter fabric. While hydrostatic pressure helps to flush silt from the pipe, all buried drain tile should be surrounded with coarse gravel or crushed stone, and wrapped with a filtering material. Without a filter, silt will contaminate the stone and eventually enter and plug the holes in the pipe (Figure 4).
 |
 |
Figure 4. Without a filter to keep silt from contaminating the surrounding stone, drain tile can be rendered useless within just a few seasons (left). Pipe that is pre-wrapped or “socked” with filter material will prevent drain tile from becoming plugged (above).
Various geotextiles are available in rolls, and pre-wrapped or “socked” pipe — pipe that is manufactured with a filter sleeve already in place — is also available.
Drain Tile LocationFilter paper and properly oriented perforations, however, will not guarantee that drain tile will work. The pipe must also be installed carefully and in the right location with respect to the footing and any interior slab.
From a pure engineering point of view, the ideal place to lay exterior drain tile is alongside the footing, because water from a rising water table enters the pipe sooner (Figure 5).
Pipe Even with Top of Footing |
Figure 5. The best location for rigid drain tile is alongside the footing. Minimum requirements for stone cover depend on whether the tile is flush with the top of the footing (top) or the bottom (middle). In either case, the top of the interior slab should be at least 6 inches above the top of the drain tile. The pipe can be laid level or pitched slightly.Where drain tile must be located lower than the bottom of the footing (bottom), avoid undermining the footing by keeping the pipe outside of a 60-degree angle measured from the corner of the footing. This location also requires more stone cover for the pipe. |
 |
|
Pipe at Bottom of Footing |
|
 |
|
Pipe Below Footing |
|
 |
The drain tile does not need to be sloped, although a slight pitch helps keep the pipe clear of silt and clay (particularly when the pipe has just two rows of holes on the bottom). Avoid trying to slope flexible drain tile, however, because you can inadvertently create dips and sags that will eventually collect silt and clog the pipe (Figure 6).
 |
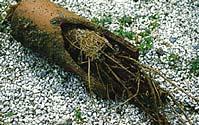 |
Figure 6. Regardless of the type of pipe used or its shape, unfiltered drain tile can easily be plugged with silt and clay (left). Water-seeking roots from trees growing too near the foundation can also completely clog perimeter drains (right).
In fact, undulating drain tile can result in premature failure of the drainage system. This problem is more pronounced when trees are growing close to the foundation, because wet silt and clay accumulating in low spots become targets for water-seeking tree roots in dry periods or in dry climates. In a relatively short period of time, tree roots can completely plug drain tile.
Some contractors create an even lower elevation for the tile by digging a small trench next to the footing. To avoid undermining the foundation, however, most codes require that the tile be placed outside a 60-degree angle from the footing.
Drain tile can also be placed on top of the footing. The advantage here is that the tile will be as level as the footing — a good strategy when using flexible pipe (Figure 7).
Figure 7. To keep flexible drain tile from developing low spots that will collect silt, place it on top of the footings, making sure that the top of the pipe is not higher than the top of the interior slab.
But this higher placement doesn’t control a rising ground water table as effectively, and may require raising the elevation of the interior slab.
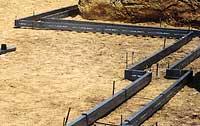
Specialty drainage products.Today there are several products on the market, such as Form-A-Drain
(CertainTeed Corp., P.O. Box 860, Valley Forge, PA 19482; 800/233-8990;
www.certainteed.com), that provide both the footing form and the drain tile
(Figure 8).
 |
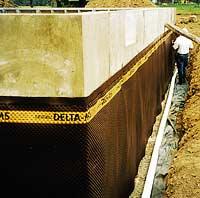 |
Figure 8. Form-A-Drain stay-in-place footing forms ensure a level perimeter drain and have a larger capacity than pipe systems (left). To control hydrostatic pressure, dimpled drainage panels fastened against the foundation wall carry water from the backfill into the perimeter drains (right).
These systems not only ensure that the drainage system is level, they often provide more flow capacity than traditional pipe systems.
On sites where an exceptionally high ground water table creates intermittent hydrostatic pressure on the foundation walls, dimpled sheets can be used in conjunction with standard drain tile. These membrane systems provide a waterproof barrier while also directing excess ground water from higher up on the foundation walls into the perimeter drains.
Discharging Collected Water
Capturing ground water in a perimeter drainage system is only half the
battle — once you’ve collected water in the drain tile, you have to
dispose of it somewhere. Discharging water into sanitary sewer systems is
generally illegal, which leaves two basic ways to get rid of the water: On
sloped sites, you can extend unperforated drain tile to daylight and discharge
the water on the ground; on flat sites, you can collect the water in a sump
basket and pump it to a discharge area away from the basement.
Gravity discharge. Two elements are critical to proper function of a gravity drainage system. First, although the perforated drain tile around the foundation itself may be level, solid pipe running from the foundation to daylight should slope at the rate of 1/16- to 1/8-inch per foot. Second, the open end of the discharge line should prevent entry by rodents, frogs, snakes, and reptiles. One method is to cover the exposed end of the pipe with 1/4-inch hardware cloth. Alternatively, you can bury the end of the pipe in crushed stone, which will allow the water to seep out below grade.
Pumped discharge. While gravity discharge to daylight is cheap and easy, I recommend installing a sump basket as a backup. A submersible sump in the bottom of the sump basket connects to a hose or rigid pipe system that carries the collected water out of the basement. If you provide for the collection sump at the time the foundation and slab are placed, the pump and discharge piping can be installed later if needed.
The sump basket should be located inside the foundation, where it can pick up ground water that rises under the slab. On a flat site where all ground water must be pumped away, water from perimeter drains should also be directed into the sump through drainage sleeves in the footing (Figures 9a & 9b).
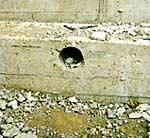 |
Figure 9a. An interior sump basket picks up excess water flowing through sleeves in the footing. |
Figure 9b. A submersible pump connected to a hose or rigid pipe discharges the water on the ground away from the foundation.
To avoid having to excavate later, be sure to place sleeves before the footings are poured. Use 4-inch-diameter pipe, and space sleeves 6 to 8 feet apart around the entire perimeter of the footing. In special cases where the slab is placed a foot or more above the top of the footings, you can locate sleeves in the foundation wall. Although water passing through the sleeves or under the footing will generally find the sump basket on its own, I recommend an interior drain pipe at the perimeter, terminating in the sump basket.
Brent Anderson owns and operates Brent Anderson Associates, a concrete contracting and consulting firm in Fridley, Minn..
This article has been provided by www.jlconline.com. JLC-Online is produced by the editors and publishers of The Journal of Light Construction, a monthly magazine serving residential and light-commercial builders, remodelers, designers, and other trade professionals.
Join our Network
Connect with customers looking to do your most profitable projects in the areas you like to work.