Business Articles - On the Job
Articles & Tips
Making Brick Repairs Disappear
With careful preparation and the right mortar recipe, new bricks can blend seamlessly into existing by Bill Phillips
We've all seen brick repairs where the new mortar and brick didn't match the original — they're visible from half a block away. Yet with a little extra effort, you can make a brick repair blend in so that it's almost unnoticeable. In 20 years as a residential contractor, I've picked up tips from many masons. Recently, I started making small repairs myself since it's often difficult to schedule a mason for a small job. In this article, I'll explain some of the tricks I use to make brick repairs disappear.
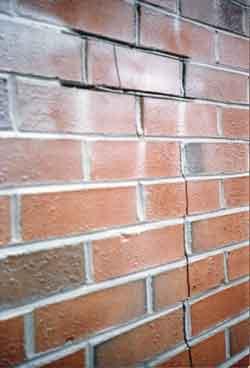 |
Figure 1. A vertical crack in the brick veneer is often the result of minor settlement in the foundation. Though these cracks typically stop moving and cause no structural problems, most homeowners like them repaired. |
Eliminate Structural Concerns
Homeowners get very concerned when they see cracks running through several courses
of the brick veneer on their house. Often these cracks are the result of minor
settling of the footing below ground level, but even slight settling can open
disturbing cracks 12 to 14 feet above grade. I won't try to deal with all the
possible reasons brick cracks. Let's just say that before making a repair, I
make sure that the settling was a one-time event and that the footing or brick
ledge is stable.
Remedial work at the ground level can include regrading for positive drainage, excavating to add or improve upon existing drain tiles and foundation waterproofing, and in the most extreme situations digging below an existing footing to pour a wider base of concrete on stable ground. For very small cosmetic cracks that have remained stable for a number of years, simple drainage work can suffice; for larger cracks that show considerable movement, digging down to firm ground and adding concrete may be necessary.
Once I'm satisfied that the base the brick sits on is secure, the repair can begin.
 |
Figure 2. Using an angle grinder, the author scores the mortar joints and cuts the bricks to be removed into small sections. He finishes the removal process with drill bits and cold chisels. |
Slow and Steady
So how do you get those cracked bricks out without busting every other brick
around them? Very carefully. After breaking a few too many perfectly fine bricks
in trying to get out the damaged ones, I came to the conclusion that slower
was better, and that removing very small pieces was the answer.
I now use a small diamond blade on a grinder to score the brick and mortar into small divisions. After the blade has gone as deep as it can — a little over an inch — I start chipping out the pieces with various-sized cold chisels and hammers. Sometimes the small 1/4-inch chisel and the two-pound hammer work; at other times, I may use a wider 1- or 2-inch chisel when I'm unlikely to crack surrounding brick.
After chipping out the front side of the brick and mortar, to a depth of about 11/2 inches, I take small (1/4 to 3/8 inch) carbide masonry bits and drill the rest of the brick full of holes — a lot of holes. This is no fun without good-quality bits and a good hammer drill. (I've had a Bosch Hornet hammer drill for about 15 years — it just won't quit.) I clean out the pieces — including, inevitably, a couple of good bricks that I accidentally break — then brush away the dust. Dust mask and goggles are a given for this work. The removal of the damaged bricks pictured here took about five hours.
 |
Figure 3. Working slowly, the author removes the cracked bricks without damaging nearby bricks. |
Making the Match
Before beginning such a repair, I always find a matching brick and experiment
with mortar color. If the house is not too old, a brick salesman can often identify
the exact brick that was used. With luck, it is still being made and you can
pick the few bricks you need from an open cube in the brick yard. I always get
extras for experimenting with mortar samples.
It's a little more difficult to match old brick, but usually a solution can be found. Some older coal-fired brick has rich, dark flashes in it, which the newer gas-and-sawdust firing process will not duplicate. Some demolition companies store old brick and can be a useful source. Another solution is to remove bricks from inconspicuous places (even below grade) and blend in the old ones with the closest matching new ones you can find.
Matching Mortar
Matching mortar is crucial, and a little extra care makes all the difference
between a repair that disappears and one that shouts out at you. I keep on hand
a bag of white mortar mix, a couple of different brands of gray mix, and a tan-colored
mix. I also use black mortar tint to dull the color of the new mortar if it
looks too bright. Finally, I keep both orange sand and white sand for the difference
it can make in shading the color of the mortar.
 |
Figure 4. A variety of ingredients make it possible to match existing mortar: white, tan, and gray mortar mixes, black mortar tint to darken the mix if needed, and white and orange sand. Shown in the foreground are some drying samples. |
Matching mortar color takes time, of course, which can make the repair expensive. But because cracked brick makes potential homebuyers just as nervous as finding rotten wood or standing water in the basement, I've found that a careful explanation usually convinces the customer of the need. Though I give very educated estimates, I typically do the work on a time and materials basis. I sleep better that way, but usually come pretty close to the estimate.
Take notes. As I mix the mortar color samples, I keep written notes of the exact proportions of each coloring ingredient in each mixture. It works well to lay two or three bricks with each sample and let them cure for a few days. I do all of this before tackling the strenuous job of removing the broken brick. As any mason knows, the same mortar sample can cure in several different shades depending on temperature, humidity, and exposure to direct hot sun. And mortar can look very different eight weeks after it is mixed than it does three or four days after.
Still, a decent match can be made even though there isn't time to wait a month for the samples to cure. I usually throw a few globs of mortar on a piece of plywood and set them in the sun to get an idea of the lightest possible shade at which the mortar could cure.
The Easy Part
Laying the new brick with the matching mortar is, of course, the easiest part
of the job. Pack it in good, point it up well, and tool it the same as the original
brick. I try to keep the brick as clean as possible while I'm laying it, using
a brush and rag to clear away excess mortar. I always go back the next day and
clean it off with water. Usually, I don't need to clean with acid after this,
but if I do, I give it a few more days, then use as little acid as possible
and rinse it well. Since acid can weaken mortar, the extra few days gives the
mortar more curing time. Typically, a careful, quick cleaning with diluted acid
and a stiff brush will removes any small smears and nubs without weakening the
surface of the mortar in the joints.
 |
Figure 5. After achieving a mortar match, actually laying the brick is easy. The author is careful to match the pointing technique of the original work. |
For a while — a day or two in the summer, a week in the winter —
the new mortar remains darker than the surrounding mortar. Within a couple of
weeks, though, it eventually blends in with the rest of the wall. It's always
gratifying to have made the extra effort.
Bill Phillips is a builder and remodeler in Durham, N.C.
This article has been provided by www.jlconline.com. JLC-Online is produced by the editors and publishers of The Journal of Light Construction, a monthly magazine serving residential and light-commercial builders, remodelers, designers, and other trade professionals.
Join our Network
Connect with customers looking to do your most profitable projects in the areas you like to work.