Business Articles - On the Job
Articles & Tips
Properly installed backer rod and caulk are the keys to a long-lasting, trouble-free application
by Harrison McCampbell, AIA
 |
| Improperly detailed EIFS joints allowed water to soak into the structure of this portico, with ugly and expensive results. |
As an architect and frequent consultant on waterproofing and building envelope failures, I see a lot of EIFS problems involving water leakage and resulting structural damage. Given the number of lawsuits involving these sorts of problems in homes built over the past decade, you'd think that builders would have learned the importance of water-shedding details. But as I see almost every day, surprisingly few of them have. Although that provides me with a measure of job security, it's also frustrating because a little attention to a few key details can eliminate a huge amount of trouble down the road.
Caulk and Backer Rod
The key to a trouble-free EIFS application is the maintenance of a 1/2- to
3/4-inch gap wherever EIFS meets a non-EIFS material, such as roofing, trim, or
doors and windows. The correct gap makes it possible to finish the exposed
edges of the expanded polystyrene — which should be backwrapped with
reinforcing mesh before the EPS is secured to the sheathing — with a
waterproofing application of base coat when the rest of the finish goes on.
Finally, the gap is filled with soft plastic backer rod and a bead of
compatible caulk.
Good caulk, bad caulk. If it's going to last, the caulking has to be done right. The surface has to be clean and dry, the caulk space must be correctly filled with backer rod, and the caulk joint itself must be properly tooled (see Figure 1).
 |
| Figure 1. Wherever EIFS meets another material, backer rod must first be installed in the joint. This keeps the caulk from adhering to the back of the joint and allows it to stretch with building movements. A correctly tooled caulk bead has an hourglass shape that is about twice as wide as it is thick. |
The backer rod serves two functions: First, it prevents the caulk bead from adhering to the back of the joint, allowing the caulk to flex in response to thermal expansion and contraction and other building movements. If the backer rod is omitted, the caulk will adhere to the back of the joint as well as the sides, limiting its ability to stretch and guaranteeing premature failure. Second, it controls the thickness of the finished application of caulk, which should ideally be about half as thick as it is wide.
It's in the truck. More often than not, though, the caulk and backer rod are never applied at all. (I'm always told, "They're in the truck.") That was the case in the repair job photographed here, where the polystyrene board was simply butted against the trim and other surfaces (Figure 2).
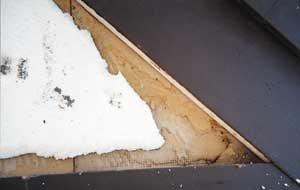 |
| Figure 2. Moisture-soaked EIFS was butted directly against the gable-end trim in this photo. Water seeped through the resulting crack and penetrated the gypsum sheathing, which had turned to gray mud in some areas. Note the impression of the reinforcing mesh on the sheathing. |
When you butt EIFS up against another material, the edge of the EPS board is
now exposed to water absorption, since there is not enough space to apply the
base coat. The caulking, if used at all, has less than 1/16 inch of EIFS
surface to adhere to in order to seal against water entry.
I have even heard EIFS contractors try to defend themselves in a failed application by pointing out that they had diligently backwrapped the edges of the EPS board with mesh, as required. But unless the mesh-wrapped edges are also embedded in basecoat, this does no good at all (Figure 3).
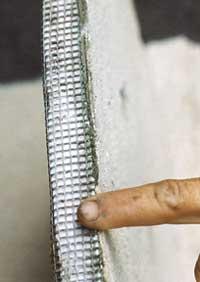 |
Figure 3. The EIFS applicator backwrapped the edges of the polystyrene with mesh, as specified — an empty exercise, because the tight spacing made it impossible to apply EIFS to the edges of the sheets. |
The solution in this case — as in so many others like it — was to tear off the improperly applied EIFS, repair the underlying water damage and rot, and reapply the EIFS system, this time leaving the required caulk spaces (Figure 4).
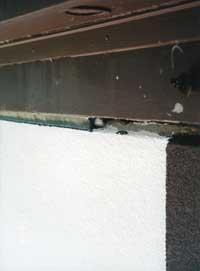 |
Figure 4. In a correctly executed butt joint — like the one in progress here — the edge of the insulation board is held back 1/2 to 3/4 inch, then backwrapped with mesh and base-coated. Note the backer rod and the well-tooled bead of caulk. |
Flashing Details
Any joints between an EIFS wall and a flashed header should also include a
suitable caulk space. I prefer soldered copper pan flashing in this
application, because it's reliably leakproof and will last at least as long as
the wall itself (Figure 5).
 |
| Figure 5. Headers and other horizontal surfaces must be protected with flashing. In this case, the damaged EIFS system has been stripped off, and a waterproof fiberglass-faced gypsum board screwed to the studs. The EPS board is attached to the sheathing with adhesive. Once the reinforcing mesh has been turned up at the front, the bottom edge of the sheet will receive a layer of basecoat. |
Better step flashing. Another common trouble spot is the joint where a wall meets step flashing at the edge of the roof. More often than not, the EIFS-covered beadboard is simply butted and caulked against the shingles (Figure 6).
 |
| Figure 6. Contrary to the manufacturer's recommendation and common sense, the EIFS applicator butted the edge of the polystyrene directly against the roofing, with no caulk space or counterflashing. |
Once this makeshift seal fails — as it soon does — the stage is again set for disaster as water wicks into the polystyrene, over the vertical leg of the flashing, and into the interior of the wall.
Making EIFS Watertight - ContinuedDoing it right involves terminating the EIFS 2 inches above the roof, and including a run of counterflashing to provide a space for caulk and backer rod (Figure 7). When it's time to replace the original shingles, the roofer can slip the new shingles and step flashing beneath the counterflashing without damaging it.
|
Incorrect Roof-To-Wall Installation
|

|
|
Correct Roof-To-Wall Installation
|

|
| Figure 7. Where EIFS butts directly against the roof (top), water will wick up into the foam board and eventually make its way past the flashing into the framing. The correct approach is to use a shaped counterflashing above the step flashing (above). The additional vertical leg creates a ledge for caulk and backer rod, and it keeps the polystyrene board clear of water running along the roof. |
Two-piece head flashing.In the case of head flashing — at the eaves wall of a dormer, for example — it's often impossible to replace the top course of shingles without bending the flashing up out of the way. When it's bent back into place afterwards, the result can look pretty rough. Worse, bending and rebending the flashing can damage the caulk joint between the counterflashing and the EIFS, letting water seep through.
|
Head Flashing
|
 |
| Figure 8. This two-piece head flashing provides a caulk space and makes it possible to renew the roofing without mangling the flashing. The counterflashing is secured to the base flashing with self-tapping sheet metal screws. |
A two-piece flashing like the one in Figure 8 allows the roofer to remove and reinstall the base flashing without affecting the counterflashing.
Harrison McCampbell, AIA, is a veteran
EIFS troubleshooter in Nashville, Tenn.
This article has been provided by www.jlconline.com. JLC-Online is produced by the editors and publishers of The Journal of Light Construction, a monthly magazine serving residential and light-commercial builders, remodelers, designers, and other trade professionals.
Join our Network
Connect with customers looking to do your most profitable projects in the areas you like to work.