Business Articles - Specialty and Trade
Articles & Tips
As an architect who has worked with the roofing industry since 1977, I often inspect leaking roofs. I have found that poor flashing details - at penetrations, at roof edges, or where a roof changes planes - are much more likely to be the cause of a leak than the roofing itself. Similarly, many leaks are caused by the use of insufficient or inadequate fasteners for sheathing, flashing, or roofing, and by the attempt to substitute caulk or roofing cement for flashing.
The cost of installing the roof on a new building usually amounts to less than 5% of the total construction cost. Yet some lawyers estimate that 60% to 80% of construction lawsuits involve roof failures. Often, it's a small leak that quickly grows into a big, expensive problem.
The following problems are among the most common I encounter. In every case, the leak could have been avoided had the installer used and paid more attention to detail.
Fasteners
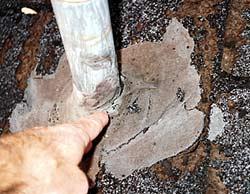
Problem: No support at sheathing edges. The plywood sheathing on this flat roof was installed without blocking under the edges. If someone walks on the roof, the roofing may crack when the sheathing flexes at the plywood joints.
Solution: Use H-clips or solid blocking at plywood edges, or use tongue-and-groove plywood roof sheathing.

Problem: Smooth-shank nails don't hold. Smooth-shank common nails used to fasten roof sheathing can work themselves loose over the years, especially if a roof deck is walked on. Rising nail heads can eventually poke through the roofing.
Solution: Use ring-shank nails for roof sheathing.
 |
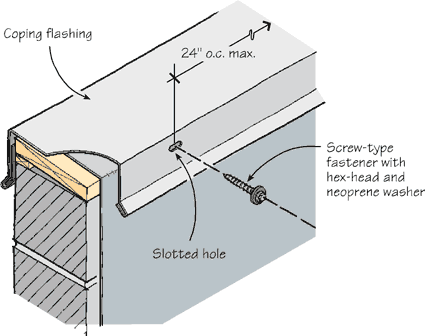 |
Problem: Flashing is
incorrectly fastened. There are three problems with the coping
flashing on this parapet wall:
An exposed fastener on the horizontal surface of the flashing is a potential leakage point. If flashing is attached with nails instead of screws, the last hammer blow can leave a concave dimple in the flashing, encouraging ponding around the nail hole.
If long runs of flashing are installed without allowing for expansion and contraction, the moving flashing can work nails back and forth until they loosen.
Solution:
Attach flashing on a vertical surface rather than a horizontal
surface.
Use hex-head screws with neoprene washers rather than nails if
it is necessary to use exposed fasteners.
Install fasteners in slotted holes, which allow the flashing to
move with changes in temperature.
by Harrison McCampbell
This article has been provided by www.jlconline.com. JLC-Online is produced by the editors and publishers of The Journal of Light Construction, a monthly magazine serving residential and light-commercial builders, remodelers, designers, and other trade professionals.
Join our Network
Connect with customers looking to do your most profitable projects in the areas you like to work.